Controversial though it may seem, and despite using Pop!_OS on my main PC, Chrome OS remains my favourite Linux ‘distribution’. I particularly like it on the Chromebook Pixel, a laptop so good I’ve bought three of them, at various times.
One thing I don’t like is having to us the Chrome web browser all the time. Thankfully, because it’s easy to get to the terminal these days in Chrome OS without having to do any kind of hacking, that’s easily fixed.
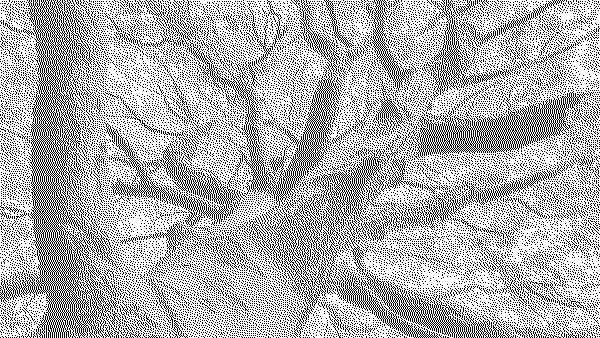
Inspired by Low-tech magazine’s solar powered website, I searched the web to find out how to create a ‘stippled’ effect for images. This reduced the size of an 2.2MB image to a mere 30.6KB, which if I’m not mistaken, is a reduction in filesize of over 95%! Here’s how to do it, using free and open source software.
2. Resize the image to the maximum width of your blog (~600px in my case) by going to the Image menu and then to ‘Scale Image…’
3. Convert the image to greyscale by going back to the Image menu then Mode and selecting ‘Greyscale’
(optional step: wash out the image by going to the Colours menu then Levels and change the number in the box under ‘Output levels’ to 180)
4. Convert the image to indexed colours by again going to the Image menu then Mode and this time selecting ‘Indexed…’
In the box that appears:
Under Colourmap choose ‘Use black and white (1-bit) palette’
Ensure box ‘Remove unused and duplicate colours from colourmap’ is checked
From the drop-down Colour dithering option choose ‘Floyd-Steinberg (normal)’
Press the Convert button
5. Export the image by going to the File menu and selecting ‘Export As…’ In the box that appears, type in a filename that ends in ‘png’ (e.g. image.png)
Last month, one of my clients got in touch to ask if I could send them some guidance around writing blog posts. They asked me to include the usual things such as:
Structuring a post
Making things clear for the reader
How to grammar/spell check
They asked me to put together something, which effectively is a couple of sides of A4 paper, for the start of the school term for a team they’ll be working with this academic year.
One of the reasons for my delay in getting started (other than the busiest summer, work-wise that I’ve ever had!) is that, rattling around at the back of my mind, is a series on how to write blog posts. While it’s important to cover the bullet points above, I think there’s things to say about in situating blog posts within a wider discourse.