 It’s easy to create a bad Powerpoint presentation. That’s because it’s easy to be fooled into thinking that because your audience is looking at something, they’re engaged with and by it. What is gained in clarity can be lost in repetition and boredom. Below are some ways to use Powerpoint more effectively and alternatives to spice up your content delivery.
First, though, here’s Don McMillan explaining some of the REALLY bad ways people use Powerpoint:
This text will be replaced
var so = new SWFObject(“http://www.edublogs.tv/flvplayer.swf”,”mpl”,”450″,”355″,”8″);so.addParam(“allowscriptaccess”,”always”);so.addParam(“allowfullscreen”,”true”);so.addVariable(“height”,”355″);so.addVariable(“width”,”450″);so.addVariable(“file”,”http://www.edublogs.tv/uploads/xvvgpn8zukcgkwgx.flv”);so.addVariable(“searchbar”,”false”);so.write(“player”);
5 quick tips if you MUST use Powerpoint…
- Never use a font size smaller than 24pt. If you have a large classroom, you may need to go even bigger than this. Stand at the back and check!
- Limit the number of words you have per slide. Don’t use them as an aid to remind you what to say. They should enhance what you are talking about, not repeat it! A great way is to limit yourself to 5 words and 5 bullet points. Alternatively, just use an image to represent your idea/concept/instruction.
- Find graphics that represent things you do frequently in lessons (perhaps from clipart) and always use these when doing a similar activity. For example, a pen writing for when it’s time to start work or two people talking for discussion/group work. These help reinforce good habits and aid classroom management.
- Use contrasting colours. The easiest way to do this is to choose an option from the ‘Slide Design’ menu. Otherwise, remind yourself of the colour wheel.
- Limit the number of different slide transitions in a presentation. One or two is classy, lots of different ones looks unprofessional.
Beyond Powerpoint…
There are lots of different tools that do a similar job to Powerpoint. For example, Keynote on the Mac and OpenOffice.org Impress (all platforms). But you don’t want to simply replicate Powerpoint’s functionality, you want to move beyond it.
Method 1 – Online presentations
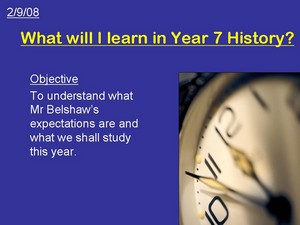
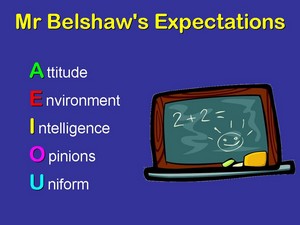
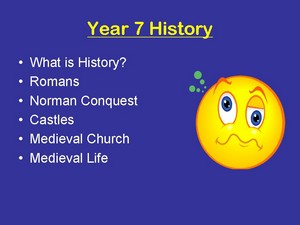
Creating presentations on, or uploading presentations to, the Internet can be extremely useful. Not only does it give you access to better visual effects than Powerpoint can offer, but it makes them readily available to your students outside the lesson. The following three slides are taken from part of the very first lesson I had with Year 7 this academic year:
This is the same presentation when I uploaded it to Google Docs and tinkered slightly:
And here it is in the wonderful SlideRocket after using some of its functionality:
Zoho Show is another option. All of these are completely free or have a free basic option. I’d recommend Google Docs if you’d like to collaborate (or students to collaborate) on presentations and SlideRocket for fancy effects. The latter has a desktop version, although you have to upgrade your account to a paid-for version to be able to download it. Of course, if you just want to make your presentations available online, you could use SlideShare…
Method 2 – Add interactive elements
- Need to show some statistics and figures? Try richchartlive.com!
- Add a short video clip to your presentation. Find it on YouTube, or another video-sharing site. Download and convert it (in this case to MOV or WMV format) via Zamzar.com. There’s an elearnr guide on how to do this here. 🙂
- The PicLens plugin for Powerpoint 2007 means you’re not restricted to a linear presentation – and it looks cool! (see below)

Method 3 – Use a completely different approach
Ask yourself, “do I really need to use a Powerpoint-style format?”. If the answer is “perhaps not!” then check out some of these suggestions:
- Glogster – we’ve already been through glogs on elearnr. They are a great, visual way to present as you can embed videos, audio and images quickly and easily.
- Mindmap – why not demonstrate good practice and create a mindmap to present ideas? Students can learn organizational skills from this, and there are a number of collaborative mindmapping sites, including MindMeister, bubbl.us, Mindomo and Mind42.
- Wiki – a wiki is a collaborative website. It’s also a great place to embed content from other websites and therefore a useful presentational tool. Your audience (i.e. students or other teachers) can also add their ideas and thoughts to it at a later date – if you want them to! I like Wikispaces, but it doesn’t seem to play nicely with our school network. I’d recommend, therefore, Google Sites, Wetpaint and PBwiki. I use Google Sites to run learning.mrbelshaw.co.uk 🙂
Finally…
Keep up-to-date with new ways and ideas for presenting ideas, concepts and content. The following are websites that can help:
Have YOU got any tips to share about good/bad practice when using Powerpoint?


![Reblog this post [with Zemanta]](http://img.zemanta.com/reblog_e.png?x-id=291d54e7-b202-4202-a831-fb6346e7972d)