
10 ways to use your interactive whiteboard more effectively
![]()
Following on from this previous blog post detailing over 30, here are what I think are 10 really effective ways you can start to use your interactive whiteboard (IWB) like a pro. I shall be demonstrating these during the Tuesday and Thursday luncthime sessions in H14. 🙂
1. Shade your screen!
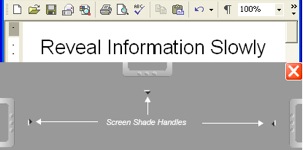
Using the Screen Shade tool you can hide part of the screen on your IWB. You can use this for starter activities where students have to guess what is in the rest of the screen or to prevent students ‘jumping ahead’ with a lesson’s learning sequence.
2. Erase lots of stuff without ‘scrubbing’
If you’ve quite a bit of writing to erase from your IWB, simply use the eraser to draw around it, then use it to press in the middle of the writing. It should then disappear! (see video)
3. Tap and drag for a more accurate IWB
It’s sometimes difficult to click exactly in the middle of the crosshairs when orienting your IWB. Instead, take one of the IWB pens, press it on the IWB near the crosshair, drag it into the middle of the crosshair, and then release. This makes the tracking on your IWB spot-on!
4. Use the SMART Lesson Activity Toolkit
In addition to the SMARTboard software, the Lesson Activity Toolkit gives you more options and flexibility with your IWB. See it in action with this four-part video: Part 1, Part 2, Part 3, Part 4
5. Use keyboard shortcuts
Learning these keyboard shortcuts could make using your IWB more productive and less frustrating:
- Ctrl+G – Group objects
- Ctrl+R – Ungroup objects
- Ctrl+K – Lock an object
- Ctrl+J – Unlock an object
- Ctrl+D – Clone an object
- Ctrl+M – Insert blank page
- Ctrl+PgDn – Send object backward
- Ctrl+PgUp – Bring object forward
- Ctrl+Shift+PgDn – Send object to back
- Ctrl+Shift+PgUp – Bring object to front
6. Record a sequence of events on your IWB
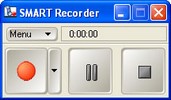
If you’re doing something procedural, it’s a good idea to record the steps you go through. Use the SMART Recorder to record what appears on your IWB. This is useful to then play on repeat whilst students are completing a task, to put on your website, or on your school’s virtual learning environment.
7. Create puzzle-image starter activities
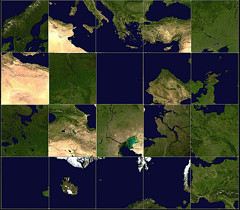
Befuddlr takes any picture from Flickr (an image-sharing website) and makes it into a puzzle. This is great for IWB’s as students can come up and re-arrange the puzzle to make meaning. Creating your own Flickr account is easy and free, so there’s unlimited potential for all different types of puzzle. Check out Tom Barrett’s suggestions for how to use Befuddlr in various ways here.
8. Rub and Reveal
Using a pen the same colour as the background covers-up words, images – anything you choose on your IWB. If you then use the eraser it will ‘reveal’ what you have covered up!
9. Google Earth
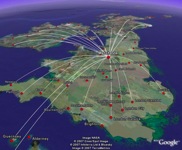
If there’s one application that comes into its own on an IWB, it’s Google Earth! You can zoom, pan and scroll as well as discover ‘layers’ to add value to your lessons. Google themselves have put together a useful guide, and there’s a Google Earth Education Community that breaks down resources by subject. You definitely need this installed and be using it in whatever lesson you teach!
10. Get involved in the Whiteboard Challenge!
The best way to learn is with other people, either face-to-face or in an online group. That’s why the Whiteboard Challenge is such a great idea. It’s a 14-week course that began on 15 August 2008. Have a look at what’s available and get involved here: http://whiteboardchallenge.wikispaces.com
*BONUS* 11. Do the double-tap!
Don’t click-and-drag, instead put the finger of one hand on the object, then the finger of your other hand where you want to move it. The object will move half-way inbetween. Remove the first finger you put on the IWB and the object will ‘fly’ across! (see video)
I couldn’t get this one to work, which is why I didn’t include it in the original 10… 😮
![Reblog this post [with Zemanta]](http://img.zemanta.com/reblog_e.png?x-id=9ff0f086-35be-4e64-bf8b-5eb456ee1817)
Hi there,
This is a really useful post!
I’m the Community Manager at the SMART Exchange and I’d love to share this information with our members. Are you okay with me cross-posting it there?
Thanks,!
Carol
Hi Carol – absolutely, no problem! :-)
Hi Doug!!
Love the ideas, but I've got a Promethian board – any top tips for them???
Thanks,
Gemma
Hi Gemma,
Oh dear – that must be punishment for leaving Ridgewood! Haven’t had too much experience with Promethean, although I believe you can install SMARTboard software alongside that which comes with your interactive whiteboard.
I’m sure you’ve already seen it, but Promethean Planet looks like it could have some decent resources for Geography. 🙂
Thankyou Mr Belshaw
smh
Thankyou Mr Belshaw
Excellent ideas suggestions. I especially agree with Google Earth being made for an IWB. I have used both ActivBoards and SMART Boards. GE can be used just as well on either board it doesn’t matter which system you use. On the ActivBoard you will just be using your pen to select, navigate and click whereas you will just use your finger on the SMART Board.
Again, thank you for some great ideas and tips.
Jim Farmer
@Steve: Thanks! It must have been good for you to say it twice… 😉
@Jim: No problem – Google Earth rocks, doesn’t it?