Open Thinkering

Menu

Tag: Design

Towards a visual hierarchy of Open Badges

This week I’ve been working with a client on the first stages of a visual hierarchy for Open Badges. This is more complex than it sounds and there are a couple of things that you should have a look at before reading further. The first is Carla Casilli‘s post A foundational badge system design, and the second is the Badge Studio* created by Andrew Hayward during his time at Mozilla.

Badge Studio

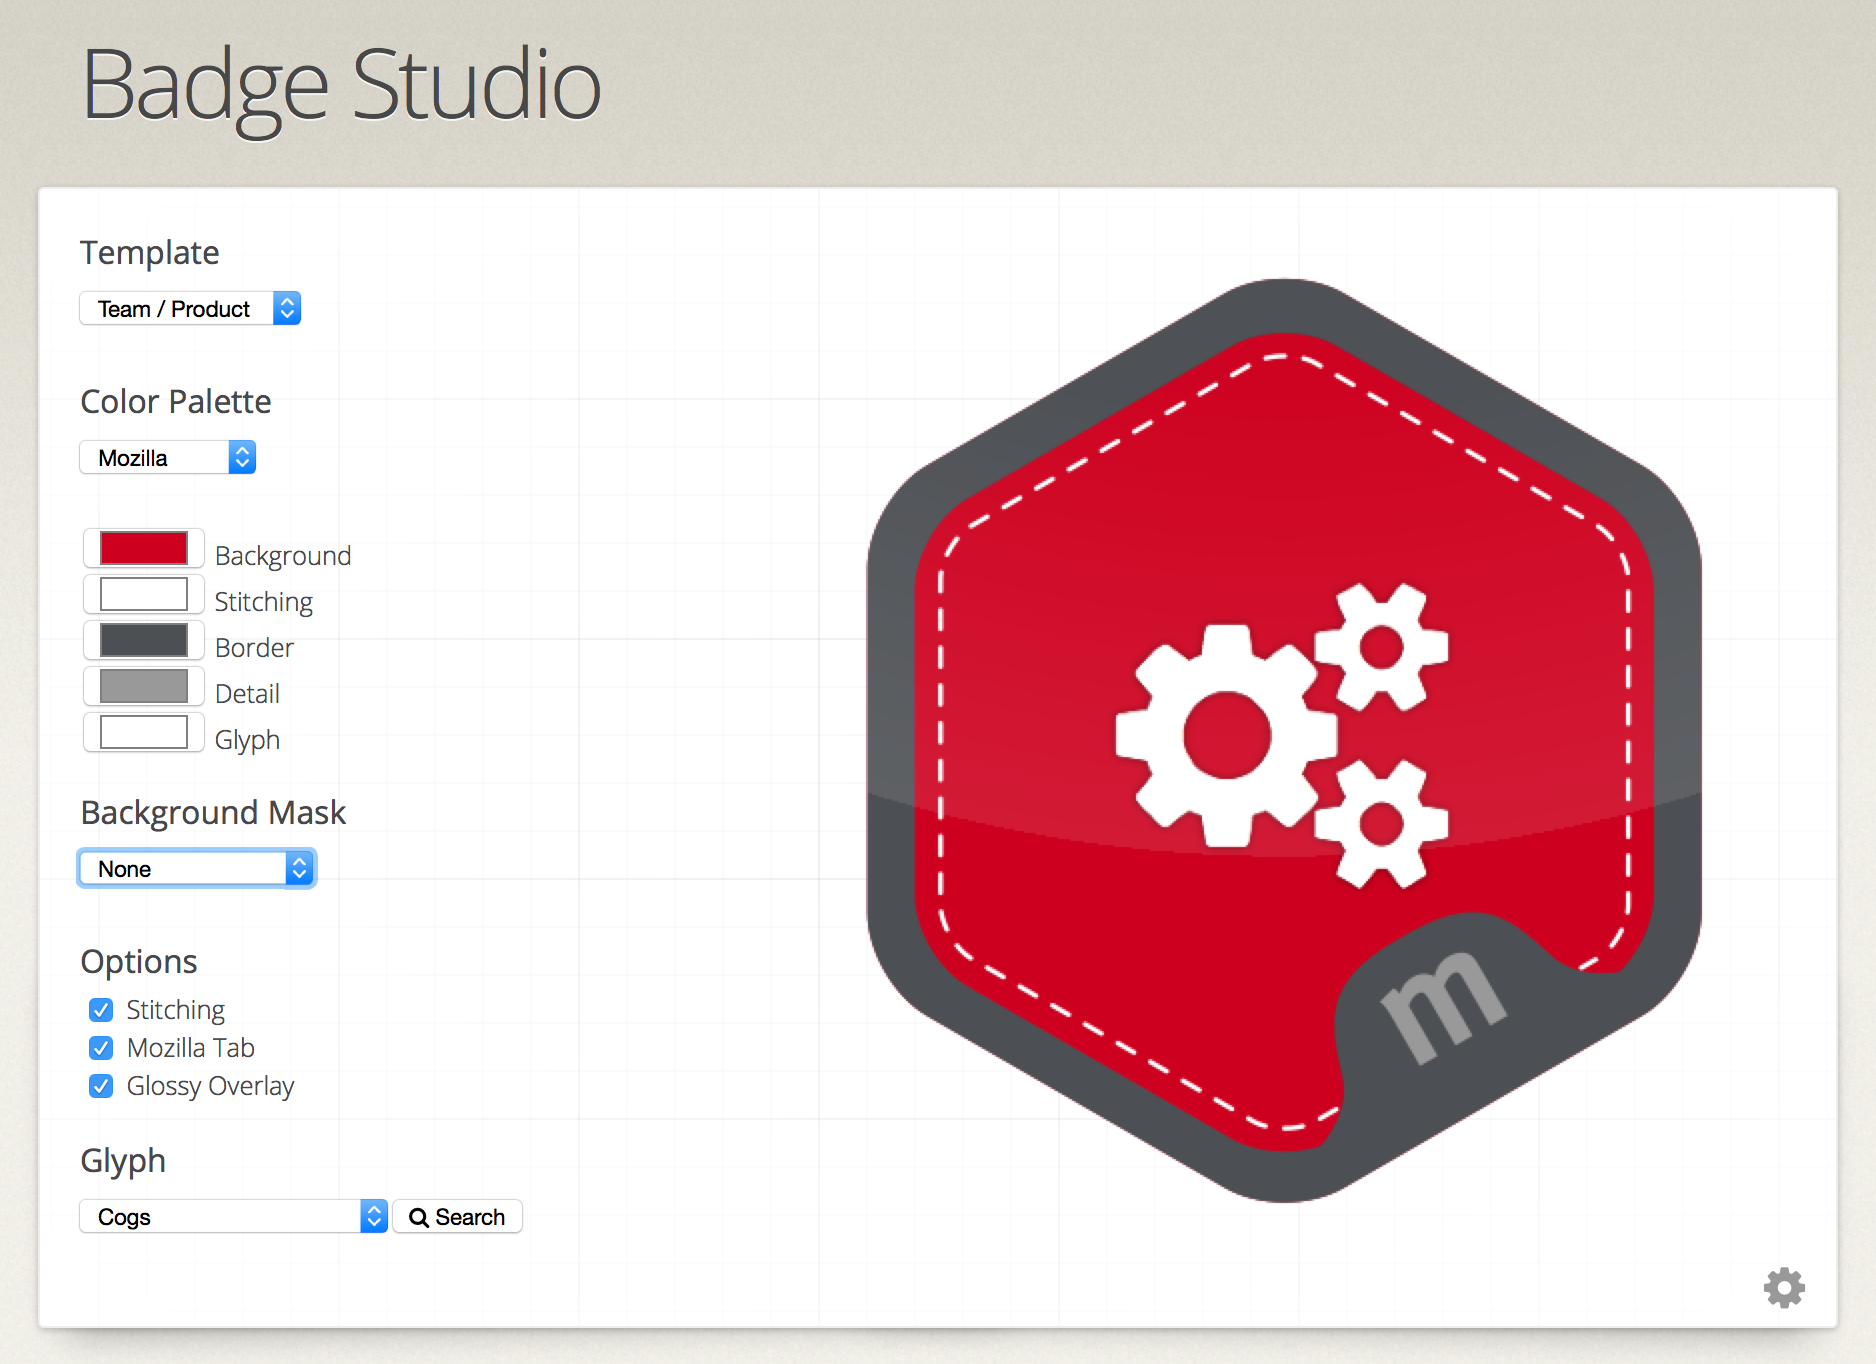
* This is an Open Source project and can be found on GitHub here.

What I like about the Badge Studio approach is that it:

  • is easy to use
  • has a visual hierarchy baked-in
  • makes it very difficult not to follow a style guide
  • removes the bottleneck of visual badge design

Variables

As with everything, the simpler and more intuitive something looks, the more work has gone into it in the first place. Here’s some variables we identified for badges across the group of companies of which my client is part:

  1. Organisation
  2. Badge name
  3. Badge yype
  4. Icon/glyph
  5. Level
  6. Logos/brand
  7. Pips (as on military insignias)
  8. Expiry
  9. Meta status (i.e. whether it’s part of, or is a meta-level badge of badges)

Differentiators

I’m sure there are others to consider, too. From there we looked at the most obvious differentiators, deciding upon shape and colour. Happily, there’s already a defined colour palette in place for each organisation that’s part of the group. They’ve also just launched a new group identity that includes five different shapes! Perfect.

Text

We agreed in the preliminary meeting that we’d try and reduce the amount of text on the badge itself. This was for two reasons: (i) users should only ever be a click away from the metadata contained in the badge, and (ii) text is likely to be difficult to read if the badge is displayed at a small pixel size.

Complexity

Theoretically, every badge issued could be both a ‘meta-level’ badge made up of smaller badges and itself part of a larger ‘even-more-meta-level’ badge. It’s potentially turtles all the way down. To prevent this potential/perceived complexity, I’ve proposed we limit the number of layers to three. This chimes well with Carla’s work mentioned above. In practice, this leads to very simple and straightforward badge pathways – which, if you want, get way more complex.

Conclusion

Creating an ecosystem of value is an extremely difficult thing to do. Essentially, you have to have to create enough productive ambiguity for it to be flexible and adapt to different contexts, while simultaneously giving people enough structure to get started. The way I’m proposing we approach that in this example is to:

  • Nail down badge colour (organisation) and badge shape (type)
  • Place a limit on the number of badges that can count towards a meta-level badge (perhaps six, using Trivial Pursuit as a metaphor?)
  • Keep iterating on the taxonomy we’ve started.
  • Look into what makes a good icon for an iOS/Android app (they rarely include text)
  • Consider where/how to show both my client’s brand and the brand of any organisation they partner with.
  • Create/keep a list of badge display requirements that are separate to the badge itself (e.g. how ‘expired’ badges look within a profile)
  • Look into forking Badge Studio to create a version for my client’s group of companies.

If you’ve got examples of a good hierarchy of visual design for Open Badges, I’d love to see it! 🙂


PS You’ve completed my 2015 reader survey, right?

How to make #openbadges work for you and your organisation.

A big hello to those arriving here from the Badges MOOC! You may be interested in my other blog posts about Open Badges as well as my presentations. 🙂


“Hi, I’m Doug Belshaw, Badges and Skills Lead for the Mozilla Foundation

“Oh, so you’re the guy heading up all of the badges work? I really like what I’ve seen so far.”

“Well actually my colleague Sunny Lee is Product Manager for Open Badges, and Carla Casilli is in charge of Webmaker Badges. I evangelise both badge systems in Europe and work on Mozilla’s Web Literacies framework.”

“Cool. I’ve been looking at badges for a while and was wondering how to implement them in my context.”

“I’m really glad you asked because I’m just about to write a blog post on that exact subject.”


I’ve had the above conversation with many people over the last few months. They tend to go beyond this, obviously, but I do need a post to point people towards.

So this is it. 🙂

The first thing to say is that there is no objectively-awesome way to issue badges. What works for one group of people in one context won’t necessarily work in another context. Having said that, there are some general principles which should stand you in good stead.

Second, you’ll find that it’s fairly natural for people to project their worldview into what is, after all, an open and emergent ecosystem. I’ve had people tell me that badges “will inevitably lead to X,” that “you can’t do Y with badges,” and that “Mozilla need to make sure that Z”. The great thing about the Open Badges Infrastructure (OBI) is that it’s a platform for third parties – including you – to innovate and think differently about their organisation is set up to do.

Third, there’s some criteria that are required for Open Badges and some that are optional.

The REQUIRED metadata fields are:

  • Badge Title
  • Description
  • Criteria
  • Image URL
  • Issuer
  • Issue Date
  • Recipient

The OPTIONAL metadata fields are:

  • Evidence URL
  • Expiration Date

What follows  isn’t the only way to approach badge design – my colleague Carla, for example, sometimes starts with the graphical element – but it’s an approach which has worked well for me over a series of conversations and workshops.

Here it is in the abstract, followed by a worked example:

  1. Decide on some behaviours, skills or attitudes you want to promote.
  2. Think of some criteria for a badge which would begin to promote those behaviours, skills or attitudes.
  3. Consider if the criteria for the badge you’ve come up with can be broken down in more granular ways.
  4. If (as is likely) you end up with multiple badges, think about multiple (potentially interest-based) pathways through your badge ecosystem. Ask yourself, which badges depend upon other badges? What are the relationships between these badges? (this may help structure that)
  5. Get someone to design you an awesome-looking graphical badge and use a badge issuing platform such as badg.us, ForAllBadges, WPBadger or BadgeStack to issue badges

This, of course, looks fairly easy but will take a decent amount of time from start to finish if done in a considered and collaborative way. Just to illustrate the point, my colleague Laura Hilliger and I are running a two-part, 5.5-hour workshop in Porto this week where we probably won’t manage to get the participants through all five steps in the time we have available.

Now, an example.

I’m always slightly wary about using examples as they tend to be held up as THE way to do things rather than A way to do it. With that in mind, let’s take as our example Alina who wants to start a new online community for teaching Webmaking skills. How could she use badges to promote the behaviours, skills and attitudes that she wants the community to embody?

  1. Alina wants to encourage community members to level up in their web skills. She’s seen that Mozilla have started to provide Webmaker badges for that, so she decides to use those for the skills element. She decides to focus her efforts on badges to encourage mentorship and community etiquette.
  2. New to the concept of badges, Alina thinks that one mentorship badge will be enough. The criteria she comes up with is that once a member has got enough ‘thank you’ upvotes using the forum software then they will automatically be awarded a ‘Mentorship’ badge.
  3. A couple of days later, Alina talks through her idea for a single Mentorship badge with a member of the community whom she meets at a conference. They raise concerns that such a system would promote people ‘begging’ for upvotes and/or lead to reciprocal backslapping. Alina goes back to the drawing board and begins to come up with a system of badges.
  4. Reflecting on her own experience as a member of various online communities, Alina realises that there are different forms of mentorship and ways of recognising it. She proposes several different granular badges which aggregate to a larger mentorship badge in different areas of Webmaking. Alina then invites some community members who already show the behaviours, skills and attitudes she is looking for to an virtual workshop. As a result, she tweaks the number of badges and the criteria for each badge. Some badges they decide should be emergent, all should be peer-assessed, and some should expire. They decide that the inclusion of an evidence URL showing how the member earned the badge would be useful.
  5. Alina announces the badge system to the wider community via a blog post and asks for feedback. She mentions that they haven’t yet come up with the visuals for the badges. A community member with an interest in graphical design volunteers to design the badges. Before long, the first iteration of the badge system is up-and-running using WPBadger, WordPress and BuddyPress.

I hope that helps. Badge ecosystem design is an iterative, emergent process. My main advice would be to make it an open, inclusive process involving the participants formerly known as stakeholders. 🙂

Image CC BY-NC AlbinoFlea

A #shoffice update (October 2012)

Back in August I posted about how working from home with my new job for the Mozilla Foundation means I needed a dedicated office. It’s just too distracting working in the main house when we’ve got two young children! I’m calling it a ‘shoffice’ as it’s a shed as far as planning regulations go (no-one’s sleeping in there) but an office as far as I’m concerned. 🙂

Since August local architect Mark Starford has been drawing up draft plans from the detailed measurements he took on that sunny day. I’m delighted Mark’s agreed to allow me to share the drawings here (and on Flickr) under a Creative Commons BY-NC-SA license. I’ve also introduced him to the delights of Pinterest via my Architecture & Design board. It’s useful to have a ‘mood board’ as it allows others to see the kinds of things you like by referencing extant things!

Below are the options Hannah, my wife, and I like so far. Mark gave us three options for the path and way down to the office. I’ve included the ‘dogleg’ version. We’re not so keen on the protruding skylight but are definitely in favour of getting as much north-facing light in as possible. Mark informed us that artists tend to favour this kind of light as it’s more constant and avoids the ‘hard light’ that distracts me when I work.

We definitely like the freestanding canopy-style protruding roof to shelter the stairs and we’re also thinking about potentially including an additional way to get down to the decking area. Hannah doesn’t want the decking to be my ‘outside office space’ and I can see her point. We’re also still thinking about the placement and shape of the windows to the west side (we don’t want any on the south side).

You can click on any of the images to enlarge them or the set is here:
Birds-eye view

West and North elevations

West and South elevations

Cutaway view of shoffice

If you’re struggling to understand how this works, it might help to know that our garden would be pretty much on a 45-degree slope if it wasn’t for a concrete ‘bunker’ under the patio. Also, the fence to the rear of our property drops down dramatically to a much lower garden level for our neighbours.

The images below may help:

Garden showing concrete bunker entry

Concrete bunker entry

Concrete bunker

And, finally, we’re absolutely going to invite our neighbours (to the side and the back) to look at the final drawings. We’re trying to make it so they hardly notice it’s there!

css.php